0

KSM me baby

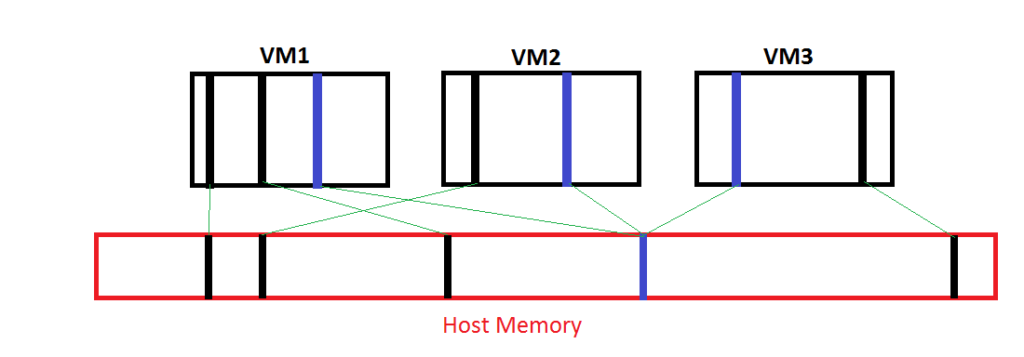
One of the methods for increasing density in the virtual workload space that is common today is deduplication. It is possible to dedupe any computing storage resource as the process simply scans for identical blocks and then stores only one of them with the rest being a pointer to the original.

In the above image the blue blocks are identical. As you can see only one is being stored in the hypervisor memory and shared among three different virtual machines. For environments that have identical operating systems or applications this can free up some memory and allow for greater density.

You might think that something as simple as a hash scan and COW pointer replacement would be available in any type 1 hypervisor. VMware ESXi used to have this functionality enabled. It was called transparent page sharing. Ever since ESXi 5.0 this was disabled by default and required every virtual machine .vmx file to be modified with a hash salt value in order to allow TPS to work. This decision was likely made due to security implications that are more theoretical than concrete. The two obvious issues being the weakening of ASLR and the possibility of rowhammer type memory leak attacks. Later on due to Large Pages support TPS became less useful as the likelihood of an entire 2MB memory page being identical was much smaller than when the pages were 4KB. As such VMware documentation suggests that this feature is only useful during memory overcommit to avoid OOM situations.

Microsoft’s Hyper-V platform has no such memory deduplication technology available.

The Linux kernel has had full scale memory deduplication available since 2009. The 2.6.32 kernel merged Kernel Same-page Merging. This is a fully configurable daemon that scans the host memory and combines identical pages to reduce memory usage. The addition of KSM allowed the KVM hypervisor at the time to run 52 instances of Windows XP each allocated with 1GB of memory on a 16GB hypervisor host. That’s a 325% memory density increase! Let’s see what it is doing on a production host with minimal OS re-use. This is a far from ideal scenario, but should yield some benefit.

root@cluster0n0:~# cat /sys/kernel/mm/ksm/pages_sharing 
326715

So we have 326,715 pages shared. Those are 4096 bits each. Some simple math shows us we are looking at a savings of 1.33GiB of memory due to KSM. Most of this is likely down to the two Windows servers running on the host.

For a more detailed academic overview you can check out this paper. Since KSM is totally tunable you can read about the available options in the Red Hat documentation.

0

KVM/Qemu cache performance

There are a few different options when it comes time to set up your virtual storage backing within the KVM environment.

Your options are:

  1. No cache
  2. Direct sync
  3. Writethrough
  4. Writeback

Let’s take a look at what we get with each.

The no cache and writethrough methods both blend data safety with a different focus. The disk write cache for no cache method will allow for better write performance. The writethrough method will offer improved read performance. Writeback has both cache options enabled and will perform the best, but at the cost of data safety. Loss of power or a system lockup will result in data that was in the buffers to be lost. While journaling and copy-on-write based filesystems will reduce the likelihood of inconsistent date leading to filesystem corruption, certain applications may have issues with dataloss of this type. Databases, for instance, will have told themselves that those transactions were flushed to storage and will expect those blocks to have been written. For these sensitive applications directsync will be the safest. Note that directsync can still be fast if you have caching done at another level. A hardware RAID controller, for instance, will allow for safe write caching when paired with a battery.

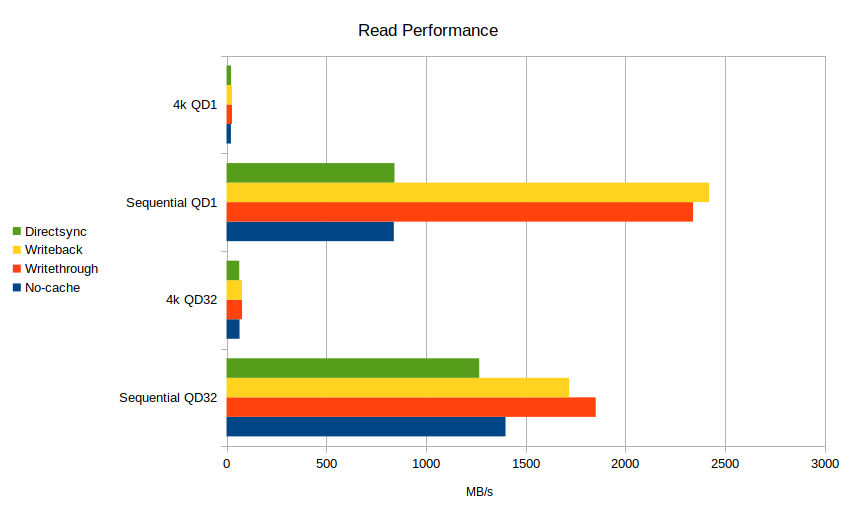
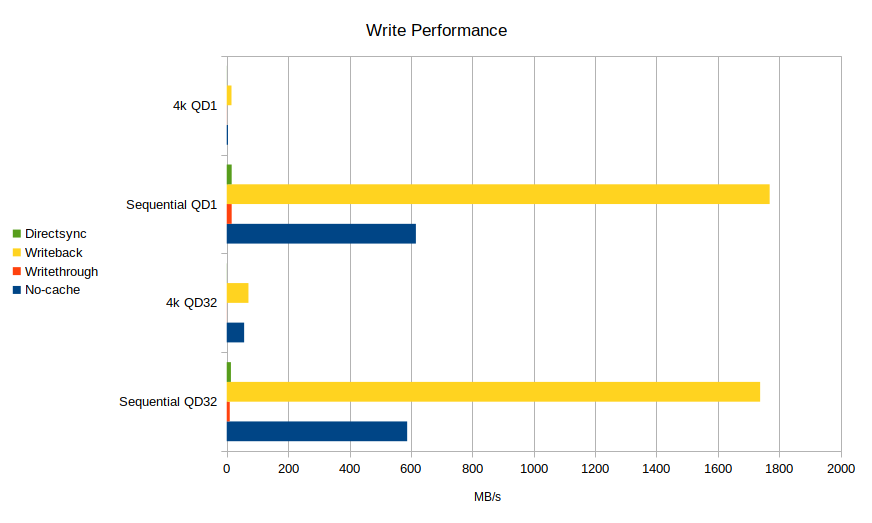
Below are some testing results for a large array of disks on software RAID. We have the four methods benchmarked at small 4k files and sequential transfer for queue depths of 1 and 32.

And we can see performance that tracks our predictions. Writethrough beats no-cache in reads. No-cache comes back and beats writethrough in writes. Writeback absolutely dominates both as it tells the application that data has been written as soon as it hits a cache.

0

Proxmox – Ready for the Big Leagues?

In the world of virtualization, a decently long pedigree and strong support are king. There is an old saying that nobody ever got fired for buying Cisco. The hypervisor equivalent would probably be either Hyper-V or VMWare. So is there room for a more homegrown Linux based virtualization platform?

I tried to flesh out some details on Proxmox in my homelab to get a general idea on performance, stability, and support. I grabbed the latest spin of the Debian based virtualization environment and went to work. With the cast-off machines I have available for testing, I didn’t expect big boy server performance. I do know, however, what kind of performance I could get with ESXi on these same machines. The install was painless and it took about 30 minutes to get my four machines booted and configured. Here is where I ran into my first problem. There are two different wiki pages in the official documentation for setting up clustering. Each had a different procedure. Some more forum digging later I learned that the pvecm command was created to deprecate the previous method. Also unlisted is the fact that you must copy your ssh key for the root user from each machine to each other machine before you begin the process of tying the cluster together. My first attempt without doing this resulted in an insufficient quorum (three machines are required). The third machine was unable to join, as the cluster leader was awaiting a quorum and did not process the added key. Be sure to ssh-copy-id before you begin. I had to reinstall and start over.

After I got the cluster created I was really excited to try out the built-in cluster storage management suite Ceph. Ceph is a really elegant approach to storage. Each node (server) has whatever storage you attach to it. You take these storage block devices and add them to a pool. The storage drives are called OSDs. Transactions in flight occur on the ODSs or on separate block devices you designate as journals. It’s best to use something with great latency characteristics for a journal such as an SSD. But I’m getting ahead of myself as, yet again, there are two separate documents outlining two separate procedures for setting up the Ceph cluster. After more digging the second link is more up to date. Unfortunately, I was unable to utilize the Ceph pool that I created as an undocumented key signing issue got in the way. What you need to do is copy the key created during cluster setup into a new directory and name it after what you wish to call your storage pool.

mkdir -p /etc/pve/priv/ceph
cp /etc/ceph/ceph.client.admin.keyring /etc/pve/priv/ceph/ceph-sshd_01.keyring

This was the third issue I ran into just trying to configure Proxmox before I even began using it to host anything. I soldier on only to discover that I am unable to upload any reasonably sized .iso to mount for OS installation. The option exists in the UI, but the web server is, by default, incorrectly configured and fails silently and repeatedly attempting to handle any installation .iso. After researching the issue it appears that a lead developer on the project doesn’t know how to configure Apache. Apache can be configured to accept any size of upload you want. Case in point my Owncloud setup:

owncloud-upload

After using scp to copy my installation media to the appropriate directory, I was finally able to install some virtual machines. Performance seemed good, especially in terms of CPU and memory utilization. Right about where I expected a lean hypervisor to perform. The storage, however, was great at reading but had deal-breaking issues with write. A write benchmark within a Linux VM put sustained writes at 8.5MB/s. For hosts connected by gigabit Ethernet, that sort of performance is inexcusable. ZFS is available as a storage backend for Proxmox, and I recommend using it. Unfortunately, you lose some of the versatility and scalability that come with a clustered, network filesystem.

Among all the documentation issues, setup foibles, and general usability problems I persevered. The final nail in the coffin was live migration. Live migration was not supported for LXC clients, and I had more downtime during live migration than I would see with Hyper-V or a VCenter cluster.

I’m really glad that a Linux based virtualization platform is being developed. It is coming along nicely, but as of December 2015 I’d have to conclude that VMWare is still king by a country mile.

Our Colo Adventure Pt II – The Software

So you’ve got an absolute monster of a server, what do you run on it? There are some really great options. If you are like my co-worker and prefer clicky clicky management and a familiar interface, there is always Windows Server. If you are hardcore and want the most stable and most performant option, FreeBSD is a strong contender. Linux is a great all-around performer and has very strong software support for whatever task you are trying to accomplish. These days though, you aren’t really all that limited with any of them as we can leverage virtualization.

In order to keep the natives from getting restless, Windows Server was our first choice. We could leverage the switch-independent NIC teaming that is new to WS 2012. Also available is a native hypervisor for separating all of our services and controlling network access through the vswitch. We both use Hyper-v at work and support numerous customer deployments on the platform. It’s not a bad system, but the management utilities are slightly lacking, especially for advanced features such as clustering. But, as we have only a single server, these issues would have had minimal impact for us.

Windows server installed just fine and getting things up and running was plenty easy. But after placing a load on the machine, we discovered several problems. The first issue was an absolute showstopper. The NIC aggregation would simply not work in a stable manner for our dual Intel NICs. No matter what we did in terms of driver versions or settings would solve the issue. The network could only sustain between 30 seconds and 1 hour of sustained load before it would become entirely unresponsive and the system would need a reboot to become functional again. While this was a dealbreaker, and Windows was dead to us at that point, we were curious about another feature new to Server 2012. Storage Spaces sounds like just a magically awesome technology for pooling drives and managing storage. You just use the GUI to make virtual disks on top of whatever physical disks you want. Then you just carve out partitions on top of the storage as normal and go to town…when it works. For our purposes the only configuration that made sense was going to be dual-parity. We couldn’t just throw away half our disk space going with a mirrored configuration. With dual parity, we would only lose 2 disks worth of space for data redundancy. While I had read that parity spaces perform badly, I was shocked to find out just how poorly it performed. The writes were most concerning:

terribad_writes

80MB/s writes, under the most ideal conditions, across 24 7,200 RPM spindles is wildly unacceptable. 4k writes and re-writes were so bad you’d almost get better performance from a 3.5″ floppy drive. I was shocked!

terribad_reads

The read performance was sawtoothing all over the place, so I took Windows Server out behind the woodshed and put it out of its misery.

The next choice was Ubuntu Server LTS. It has a nice long 5 year support window, and it’s just a nice sane Linux implementation. We would have gone Centos, but I really needed a newer kernel because I wanted to employ ZFS. I could write an entire post on why ZFS is the most amazing thing since sliced bread. I might even do that sometime, but staying on point…ZFS was lightyears ahead of Spaces. With all the disks in three separate RAID-Z1 vdevs we made a single pool. Benchmarking this pool yields 1.2+ GB (yes, gigabytes) per second for sustained uncached reads. Writes hover around the 800MB/s range. The performance is just phenomenal. On top of that we get to make use of our 48GB of RAM for read caching, which just makes things even faster. I couldn’t be happier with our disk performance.

UFW makes a really simple IPTables frontend for managing our traffic and locking down ports.

We also started using KVM to keep things sane and separated, which leads us into part III.